SmartWave - jQuery Content Carousel Plugin
You just purchased SmartWave! If you have any questions that are beyond the scope of this help file, please feel free to email via my user page contact form here
Thank you. flGravity
Documentation
← Back to Demo1. About
SmartWave is a smart content carousel plugin with a lot of great and unique features!
Along with smooth CSS3 hardware-accelerated scroll, retina-ready controls and ability to work in almost any browser, starting with IE8 up to iOS/Android touchscreens, with SmartWave plugin you also get these nice features - ability to rotate items in perspective by any degree, scroll-dependent rotation, intelligent resize, lazy loading of images for items and finally two scroll modes.
SmartWave also can recognize user interaction with carousel items on desktop (mouse hover) or touchscreen (tap) by providing corresponding helper classes and callbacks. This will help you incorporate various CSS3 animations into items and be sure they will execute on any device!
Also SmartWave comes with 5 pixel perfect skins for your quick start!
2. Installation
To install SmartWave jQuery plugin first thing you should copy few files from ZIP package that you have downloaded from Codecanyon to the corresponding folders under your site.
So the files are
js/jquery.smartwave.min.js
css/smartwave.css
images/sw-controls.png
images/sw-controls@2x.png
images/sw-grab.png
images/sw-grabbing.png
images/sw-preload.gif
images/sw-shadow.png
also copy 3rd-party scripts
js/jquery.easing.1.3.js
js/jquery.hoverIntent.min.js
js/jquery.mousewheel.min.js
When you finish copying files you should link them in head of your page. Here is what you should insert
<link rel="stylesheet" type="text/css" href="css/smartwave.css">
<script type="text/javascript" src="js/jquery.easing.1.3.js"></script>
<script type="text/javascript" src="js/jquery.mousewheel.min.js"></script>
<script type="text/javascript" src="js/jquery.hoverIntent.min.js"></script>
<script type="text/javascript" src="js/jquery.smartwave.min.js"></script>
Also make sure that you have jQuery library included before any of JS files above. You may get latest jQuery from here - https://jquery.com/download/
Basic HTML markup for SmartWave carousel should look like so
<div id="sw1" class="smartwave">
	<ul class="sw-list">
		<li>
			<div class="sw-content">
				<img src="pics/blank.png" data-src="pics/1.jpg" alt="">
			</div>
		</li>
		<li>
			<div class="sw-content">
				<img src="pics/blank.png" data-src="pics/2.jpg" alt="">
			</div>
		</li>
		<li>
			<div class="sw-content">
				<img src="pics/blank.png" data-src="pics/3.jpg" alt="">
			</div>
		</li>

		…

		<li>
			<div class="sw-content">
				<img src="pics/blank.png" data-src="pics/N.jpg" alt="">
			</div>
		</li>

	</ul>
</div>
You can add as many LI items as you need. The markup above is for simple image carousel. If you would like to use any of predefined skins, please refer to section "6. Skins" for respective markup.
You may be curious why images have "data-src=" attribute. Well, this is part of "Lazy Loading" which is enabled in plugin by default. When you specify image as
<img src="pics/blank.png" data-src="pics/3.jpg" alt="">
browser will load "pics/blank.png" that is 4KB and takes no bandwidth. Whereas real image "pics/3.jpg" will be loaded only when it's needed. You can find "blank.png" in pics/ folder and use with your images.
Ok! When markup is ready it's time to add plugin init code
<script type="text/javascript">
	$(document).ready(function(){
		$('#sw1').smartwave({
			itemRatio: 1.6,
			itemMinWidth: 200,
			itemMaxWidth: 400,
			visible: 3
		});
	});
</script>
and make sure that you inserted this JS code after the a line that links "js/jquery.smartwave.min.js"
Now it's time to add some options!
The first option is called "itemRatio" and it defines aspect ratio for carousel items. By default it's 1 and it will make items square. It's fine if your images are square as well! But if they are not, you will have to set correct "itemRatio". For example, if you have landscape photos and their size is 800x500 pixels, value for "itemRatio" should be 1.6 (800/500 = 1.6). Also you can disable "itemRatio" by setting it to false. In this case items height will be "auto".
Next two options are "itemMinWidth" and "itemMaxWidth". These options set allowed range for item width. So, when you resize browser window, plugin will change items width in respect to these values.
Another option that relates to previous two is called "visible". It tells plugin how many items to show, and by default it's 4.
By using these options, plugin will attempt to display "visible" number of items and adjust items width to be within min/max range.
3. Options
Below is a list with plugin options and callbacks that you can use with SmartWave
// default options
var defaults = $.extend({
	css3: true,						// use CSS3 transitions
	duration: 500,					// carousel scroll duration, ms
	easing: 'swing',				// carousel scroll easing
	visible: 4,						// how many items should be visible
	startAt: 0,						// item to start with, zero-based index
	itemMinWidth: 200,				// min item width, px
	itemMaxWidth: 400,				// max item width, px
	itemRatio: 1,					// item's aspect ratio or false for "auto"
	lazyLoadImages: true,			// load images only when they appear in viewport
	snap: false,					// enable "snap" scroll mode
	snapByOne: true,				// snap by one, or snap all visible items at once
	snapThreshold: 20,				// snap threshold, px
	rotate: false,					// enable items rotation
	rotateAngle: 7,					// items rotation angle, degree
	rotateNogaps: false,			// collapse gaps between rotated items
	rotateShadows: true,			// show shadows when items rotate
	rotateDuration: 300,			// items rotation duration, ms
	rotateEasing: 'swing',			// items rotation easing
	autoplay: false,				// enable autoplay
	autoplayDelay: 2000,			// autoplay delay, ms
	autoplayAutoStart: true,		// start autoplay on plugin init
	autoplayPauseHover: false,		// pause autoplay on mousehover (if available uses "hoverIntent")
	autoplayProgress: true,			// show progress indicator
	touchswipe: true,				// enable touchswipe
	swipeInertia: 0.25,				// the lower the number the more inertia is given to swipe (0 - 1)
	mousewheel: true,				// enable mousewheel (requires js/jquery.mousewheel.min.js)
	keyboard: false,				// enable keyboard
	navigation: true,				// show next/prev navigation controls
	pagination: true,				// show pagination controls
	scrollbar: false,				// show scrollbar controls
	onReady: function(){},			// ready callback (plugin API object as argument)
	onAutoplay: function(){},		// autoplay start/stop callback (status as argument)
	onMoveStart: function(){},		// move start callback (array of items that were visible)
	onMoveEnd: function(){},		// move end callback (array of items that became visible)
	onRotateStart: function(){},	// rotation start callback (direction of rotation as argument)
	onRotateEnd: function(){},		// rotation end callback
	onActivateItem: function(){},	// item activate callback, e.g on touch or hover (item DOM as argument)
	onDeactivateItem: function(){},	// item deactivate callback (item DOM as argument)
	onPreloadImages: function(){},	// images preload callback (item DOM as argument)
	onResize: function(){}			// resize callaback
}, options);
Please note that inside of every callback function keyword "this" refers to SmartWave container DOM element. Also if function accept arguments it's mentioned in () comments above.
4. API
SmartWave plugin provides next API methods
- moveTo(index) - method to move to item by its index (zero-based)
- moveNext() - method to move one item forward
- movePrevious() - method to move one item backward
- moveRaw(amount) - method to move carousel by some amount, from 0 to 1
- isAutoplayStopped() - returns true if autoplay is stopped, otherwise false
- stopAutoplay() - method to stop autoplay
- startAutoplay() - method to start autoplay
- refresh() - method to force carousel to recalculate widths and visible number of items
- getVisible() - returns jQuery object containing visible items
These methods should be called via SmartWave API object which you can get with $.data('smartwave-api'). Here is, for example, how you can scroll to 3rd item using moveTo()
var sw_api = $('sw1').data('smartwave-api');
sw_api.moveTo(2);
5. Helper Classes
For styling or other purposes SmartWave provides a set of helper classes that you can find below.
Classes for SmartWave container:
- sw-dragging - on touch device or when you drag with mouse after 5px threshold
- sw-swiping - when plugin detects swipe gesture class is added before swiping transition begins
- sw-rotate-right, sw-rotate-left - correspond to direction of rotation
- sw-rotation - class is added when items start rotating
- sw-snapping - class is added when snap transition begins ("snap" scroll mode should be enabled)
- sw-ready - is added when carousel is ready (with 200ms delay)
- sw-error - is added when there is not enough items in carousel to display properly
- sw-visible-{n} - this class corresponds to the number of currently visible items "n"
- sw-no-css3 - is added when plugin cannot detect CSS3 support or when css3 option is false
- sw-auto-height - is added when itemRatio option is false (all items have "auto" height)
- sw-touchswipe - is added when touch swipe option is enabled
- sw-mousewheel - is added when mouse wheel option is enabled
- sw-has-navigation - is added when navigation option is enabled
- sw-has-pagination - is added when pagination option is enabled
- sw-has-autoplay - is added when autoplay option is enabled
Classes for carousel items:
- sw-images-loaded - is added to carousel <LI> item when all images for that item have been loaded
- sw-skip-preload - this class can be manually added to item to skip image preloading
- sw-active - is added to <LI> item when user interacts with it (see below)
Particularly useful can be "sw-active" class. This class is assigned to the item when user moves mouse pointer over it on desktop, or taps item on touch device. You should use this class instead of ":hover" if you want to add CSS3 animations to the items. Relying on "sw-active" will ensure that your animations will work on any device!
Also, if you need to run custom JS code, you can use "onActivateItem()" and "onDeactivateItem()" callbacks, that accept item DOM as argument.
6. Skins
SmartWave plugin comes with 5 bonus skins to help you start quickly! To attach skins you should copy "smartwave-skins/" directory to the root of your site. Then in head of your page link "smartwave-skins/skins.css" (make sure you do this after "css/smartwave.css")
<link rel="stylesheet" type="text/css" href="smartwave-skins/skins.css">
When it's done, add markup for carousel
<div id="sw1" class="smartwave sw-skin1">
	<ul class="sw-list">
		<!-- skin specific LI items shortly will be here -->
	</ul>
</div>
Please note that next to "smartwave" class there is "sw-skin1" class. You should add this class to enable "Skin 1". For other skins you will add classes "sw-skin2", "sw-skin3", etc. Also at this moment there is no LI items in markup above. That's because every skin has slightly different markup, see below
"Skin 1"

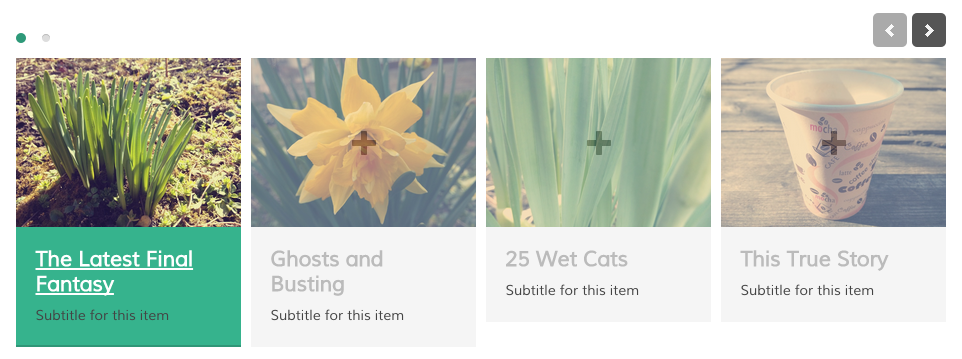
<li>
	<div class="sw-content">
		<div class="sw-clip">
			<img src="pics/blank.png" data-src="pics/1.jpg" alt="">
		</div>
		<div class="sw-caption">
			<h4><a href="#">Title Here</a></h4>
			<p>Subtitle for this item</p>
		</div>
	</div>
</li>
"Skin 2"

<li>
	<div class="sw-content">
		<img src="pics/blank.png" data-src="pics/1.jpg" alt="">
		<div class="sw-caption">
			<h4><a href="#">Title Here</a></h4>
		</div>
	</div>
</li>
"Skin 3"

<li>
	<div class="sw-content">
		<img src="pics/blank.png" data-src="pics/1.jpg" alt="">
		<div class="sw-caption">
			<h4><a href="#">Title Here</a></h4>
			<p><time>Mar 03, 2015</time></p>
		</div>
	</div>
</li>
"Skin 4"
<li>
	<div class="sw-content">
		<a href="pics/1.jpg" target="_blank">
			<img src="pics/blank.png" data-src="pics/1.jpg" alt="">
		</a>
		<div class="sw-caption">
			<h4><a href="#">Title Here</a></h4>
			<p>Subtitle for this item</p>
		</div>

	</div>
</li>
"Skin 5"
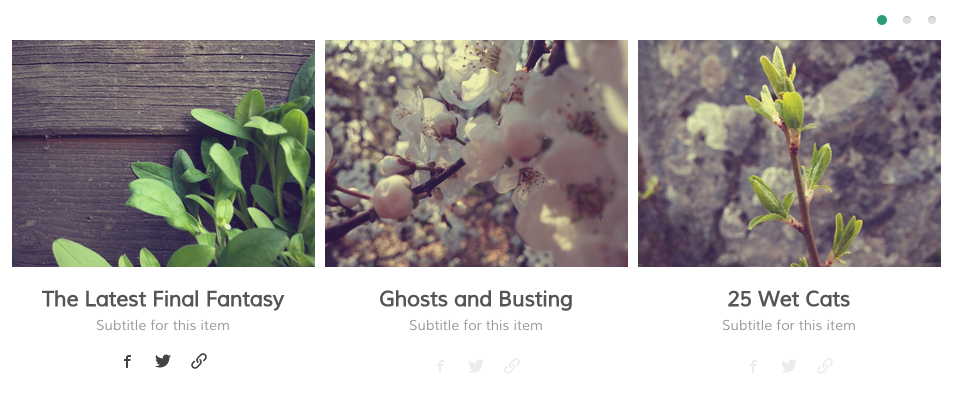
<li>
	<div class="sw-content">
		<img src="pics/blank.png" data-src="pics/1.jpg" alt="">
		<div class="sw-caption">
			<h4><a href="#">Title Here</a></h4>
			<p>Subtitle for this item</p>
			<div class="sw-share">
				<a href="#" class="sw-facebook"></a>
				<a href="#" class="sw-twitter"></a>
				<a href="#" class="sw-link"></a>
			</div>
		</div>
	</div>
</li>
In "sw-share" DIV you can have following social/share links
<div class="sw-share"">
	<a class="sw-deviantart"></a>
	<a class="sw-dribbble"></a>
	<a class="sw-facebook"></a>
	<a class="sw-feed"></a>
	<a class="sw-flickr"></a>
	<a class="sw-google-plus"></a>
	<a class="sw-image"></a>
	<a class="sw-link"></a>
	<a class="sw-menu"></a>
	<a class="sw-picassa"></a>
	<a class="sw-pinterest"></a>
	<a class="sw-play"></a>
	<a class="sw-plus"></a>
	<a class="sw-search"></a>
	<a class="sw-share"></a>
	<a class="sw-twitter"></a>
	<a class="sw-vimeo"></a>
	<a class="sw-youtube"></a>
</div>
More PNG/SVG icons you can get here https://icomoon.io/app/ from "IconMoon - Free" set and add to "smartwave-skins/skin.css" file.
Thanks for reading!